Deployment of an Azure File Share as an iManage Work File Repository

This post is primarily aimed at those with an on-premises installation of the iManage Work Document Management System. I will be walking through the full process of creating an Azure File Share, and then configuring iManage Work to connect to it. This will not apply to those of you on iManage Cloud as your storage is completely managed by iManage, and you are not able to set up custom File Repositories.
This can be configured on any version of iManage Work and the steps should be largely the same no matter which version you have installed.
What's the point?
The first question you may be asking is "What's the point, why would I want to do that?". If not - tough, that's the question I'm answering in this section.
Azure Files is an excellent offering in Microsoft Azure that offers a fully managed file share in the cloud that can be accessed using the SMB protocol. Rather than selling you on the benefits of Azure Files, I'll let Microsoft do that: https://docs.microsoft.com/en-us/azure/storage/files/storage-files-introduction
The reason I ended up down this path in the first place is due to a customer requirement to migrate a large amount of legacy data into iManage Work but they did not have the space to do so. I was able to quickly provision an Azure File Share and connect iManage Work directly to the Azure File Share and the migration was able to proceed with none of the usual delays involved in physical storage expansion projects.
It's also extremely cost-efficient with 1GB of Standard 'Hot Tier' in UK West costing around 2p per month. This then falls to around 1p per month for the 'Cool Tier'. These prices include the use of LRS redundancy which replicates your data three times within a single physical location in the primary region and provides at least 11 nines (99.999999999%) durability of objects over a given year. More information on pricing, storage options, and redundancy can be found at https://azure.microsoft.com/en-us/pricing/details/storage/files/.
So to answer the question - the "point" is the fact that you can quickly provision huge repositories (up to 100TB) on-demand, and it isn't as expensive as you'd think.
Do I suggest pushing ahead and using this for all of your files in iManage Work? No. Not without first doing your own investigation. In the example above these were legacy files that are not frequently accessed, and Azure Files is acting as 'cold storage'. That's not to say it isn't possible to use an Azure File Share for all files but you would need to do your own assessment on the viability of this.
Considerations
Before you push ahead and set this up there are some key considerations you need to be aware of. This is not a definitive list - you will need to make sure this is suitable for your organisation before proceeding. Here are some key things you will need to consider/remember:
- Do you have suitable throughput to fetch files as clients request them? Clients will never connect directly to the Azure File Share as all files will be fetched and served by the iManage Work Server.
- You still need to back it up. Just because it's in Azure doesn't mean you can forget this. I won't be covering this in this post. (https://docs.microsoft.com/en-us/azure/backup/backup-afs)
Creating the Azure File Share
The first thing we need to do is create the Azure File Share so that we have something to connect to. I'm going to assume that you already have an Azure Subscription and that you have the correct rights to create resources.
- First of all, we need a Storage Account. If you already have one you can use that. If not, we can go ahead and create one by navigating to Storage Accounts, select the "+ Add" button. Complete all fields and then deploy it. You can use https://docs.microsoft.com/en-us/azure/storage/common/storage-account-create if you're not sure about any of the fields.
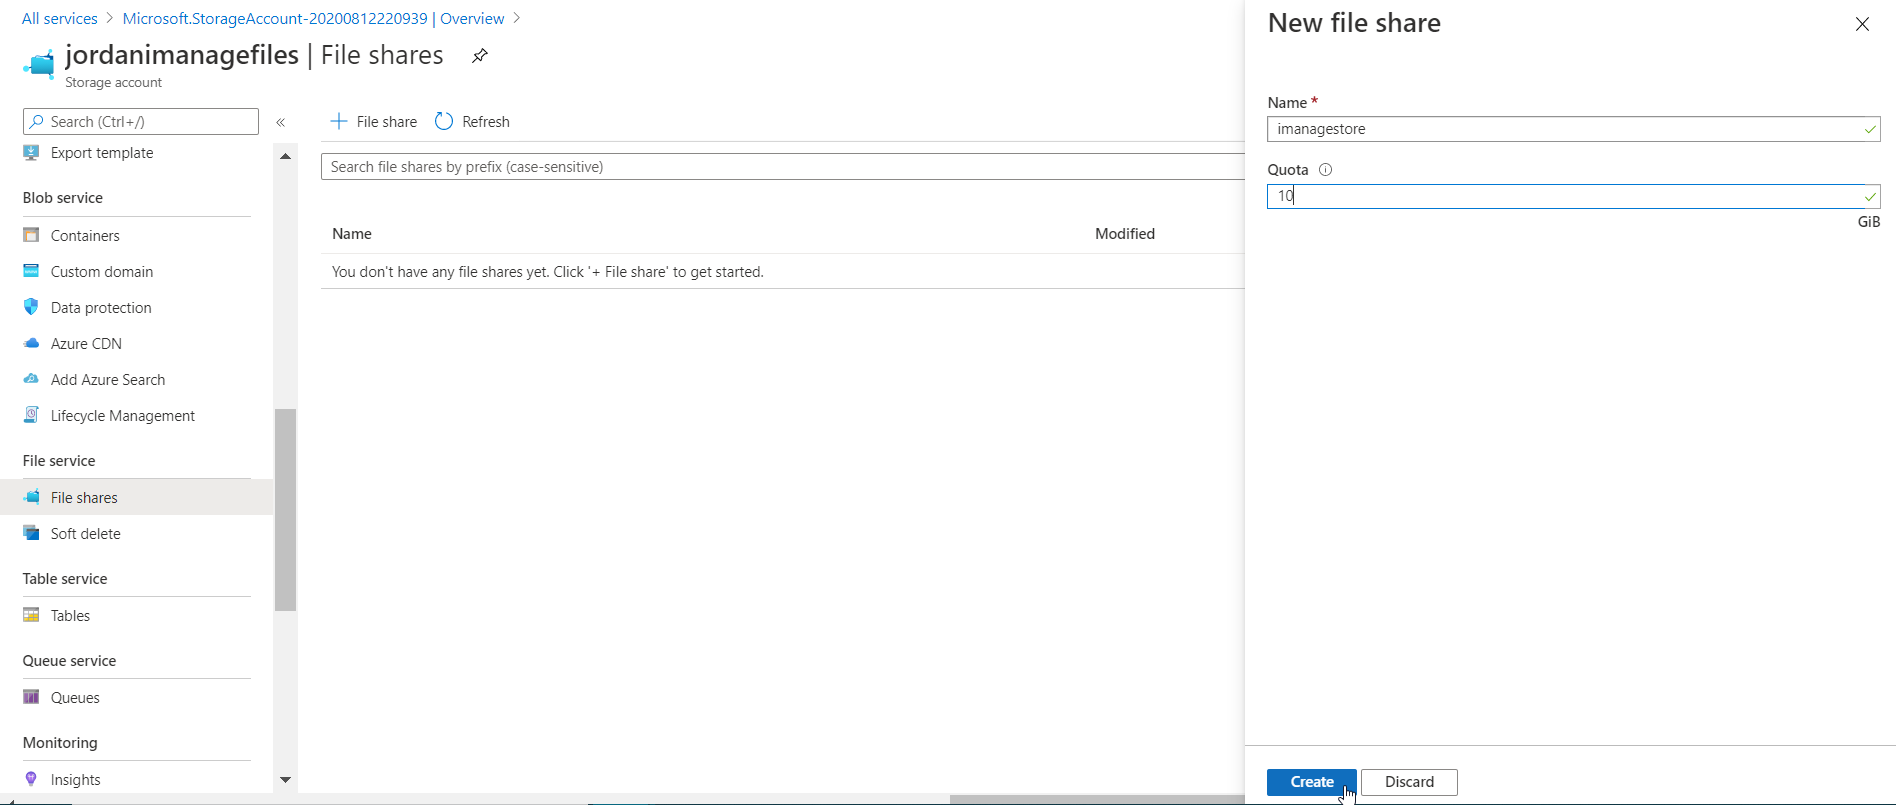
- Next, we need to create the Azure File Share. Navigate to your Storage Account and select the File Share option on the left hand side. Select the "+ File Share" button to create a new File Share. Complete the name and quota fields.
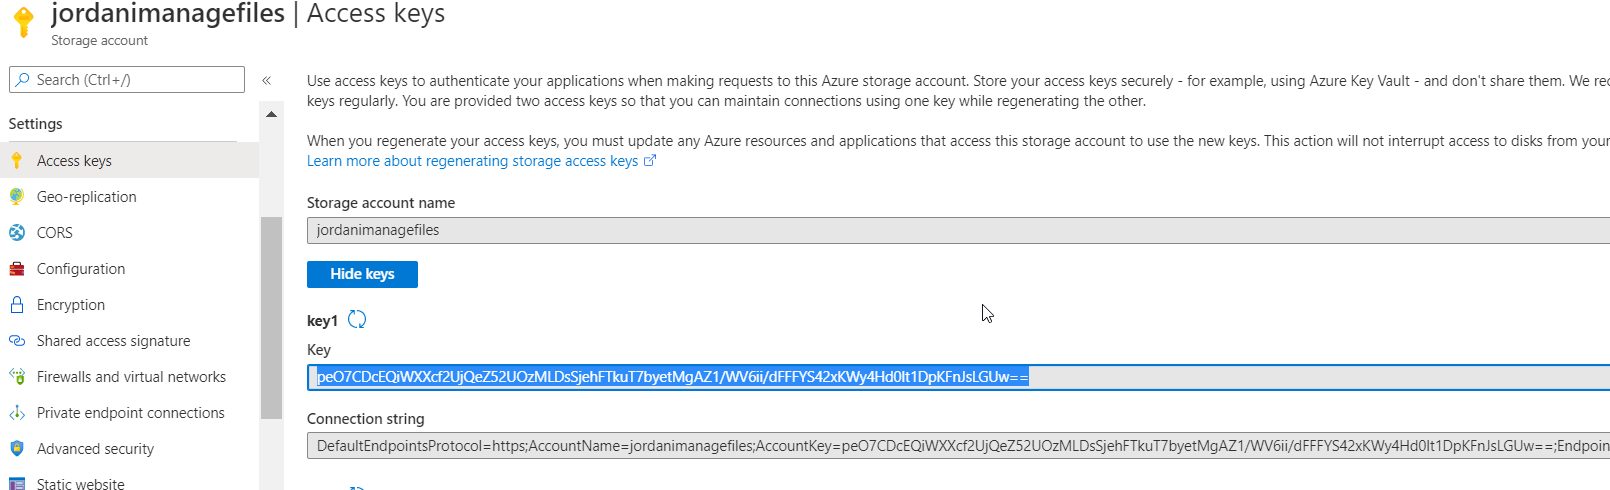
- While we're here let's grab a copy of the Storage Access Key that we'll use to connect your iManage Servers to the File Share. You will find this key in the Access Keys tab on the left hand side of the Storage Account.
DO NOT SHARE YOUR KEY WITH ANYBODY OR THEY WILL BE ABLE TO GAIN FULL ACCESS TO YOUR STORAGE ACCOUNT (UNLESS YOU CONFIGURE IP RESTRICTIONS AS WE DO IN THE NEXT SECTION)
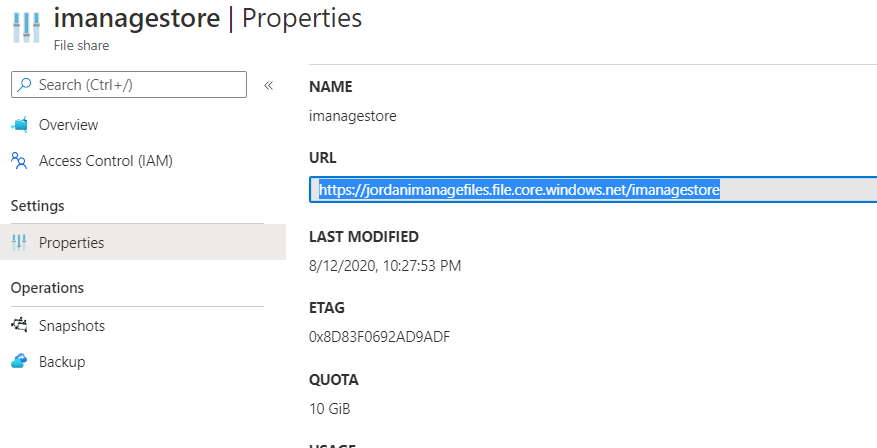
- Let's also jump into the File Share and take note of the URL of the File Share. This can be found in the Properties of your File Share and will be in the format of {storageaccountname}.file.core.windows.net/{sharename}
The Azure File Share is created and ready for us to throw files at. But before we do, let's add some extra security to our Storage Account.
Securing Your Storage Account with IP Restrictions
We will now configure IP based restrictions on your Storage Account. While this step isn't required to configure the Azure File Share, it's definitely worth doing.
This can be configured in the 'Firewalls and virtual networks' section of your storage account. Modify 'Allow access from' from 'All networks' to 'Selected networks'. You can then add your public IP Ranges to the 'Firewall' section:
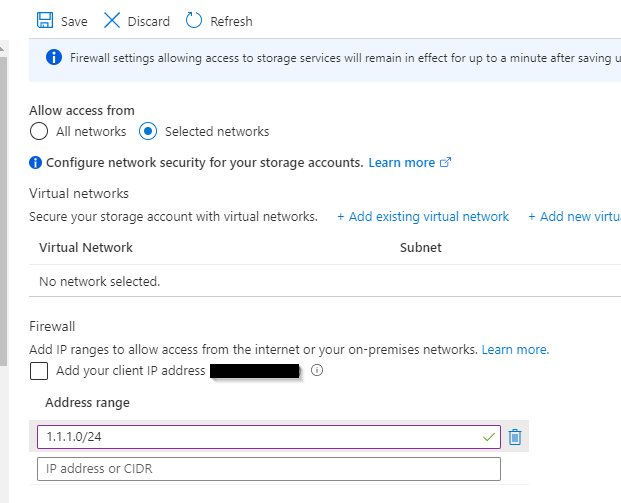
This will now provide an extra layer of security by only allowing access to your Storage Account from the IP Ranges you add to this list.
Creating Your iManage Work File Server Entry
We now have our Azure File Share ready to throw files at. Now we need to prepare the iManage environment to connect to it which we'll start by creating the File Server entry in iManage Work using the DBAdmin tool. Doing so will allow us to assign the File Server to users within iManage Work, which means any new documents created by that user will be created on the Azure File Share.
This is particularly useful during a migration as content can be migrated using a placeholder author (e.g. CLOUDIMPORT) that is assigned to the Azure File Share iManage File Server. This means you can likely use your existing migration processes and tools just by substituting the author of the document or email with your placeholder author and the content will end up in the Azure File Share. I'm not going to go into the migration aspect of this in this article, so if this is something you'd like to know more about please reach out.
Anyway, on with the configuration...
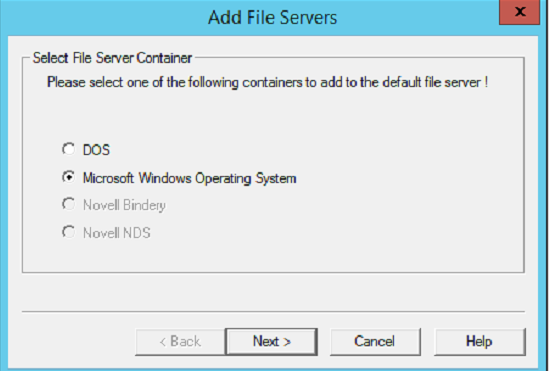
1) Navigate to each database within the DBAdmin tool and open the File Servers tab.
2) Select Manage in the toolbar and select Add
3) Select the default Microsoft Windows Operating System
4) Enter the File Server Name. This can be anything you like and is used in the DB as a replacement for the path (i.e. \\jordanimanagefiles.file.core.windows.net\imanagestore\DBname\Author\0\1\99999.1 would become AZUREFILESHARE:\DBname\Author\0\1\99999.1)
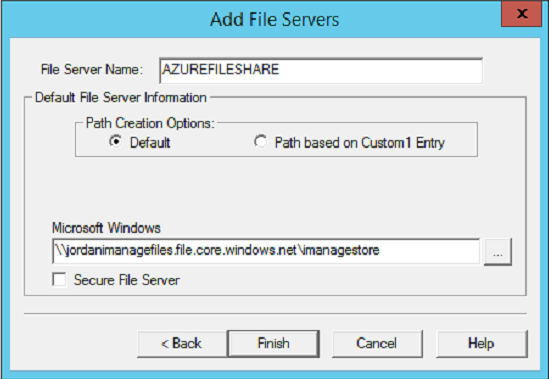
5) Enter the path to your Azure File Share. We grabbed this in step 4 of the Creating the Azure File Share section.
6) Select Finish and you now have an iManage File Server entry.
Don't get too excited - we still have more to do.
Configuring Access to the File Share
Go ahead and paste the path into File Explorer... As expected we are prompted for network credentials. For obvious reasons this isn't ideal, we need iManage Work to be able to connect to this File Share whenever it needs to.
And to do this we need to use the cmdkey command to store the credentials. These credentials are in the following format:
Username: Azure\StorageAccountName
Password: Storage Access Key (generated earlier in this article)
Thankfully there's an easy way to get this command:
1) Login to the Microsoft Azure Portal
2) Navigate to your Storage Account
3) Navigate to File Shares and find your file share
4) Right click the File Share and select "Connect"
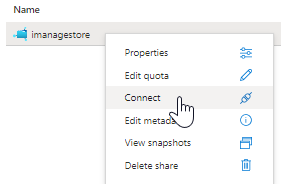
5) The following pane will appear:
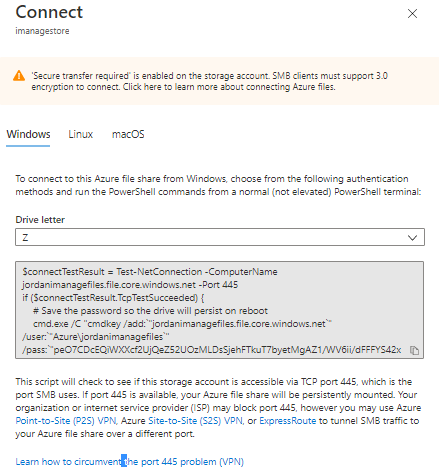
The grey box contains Powershell that will check access via TCP port 445, create the cmdkey entry, and then map it to the chosen drive letter. We don't need any drive mappings for this so we can simply copy the cmdkey command and run it from CMD or Powershell.
cmdkey /add:"jordanimanagefiles.file.core.windows.net" /user:"Azure\jordanimanagefiles" /pass:"peO7CDcEQiWXXcf2UjQeZ52UOzMLDsSjehFTkuT7byetMgAZ1/WV6ii/dFFFYS42xKWy4Hd0lt1DpKFnJsLGUw=="
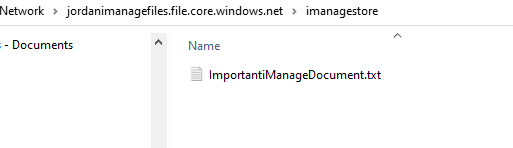
Now if I try to open \\jordanimanagefiles.file.core.windows.net\imanagestore from File Explorer again... We're in!
BUT... These credentials are only stored for the user that ran the cmdkey command. So iManage is still unable to access the Azure File Share. We now need to run the cmdkey command under the context of your iManage Service Account.
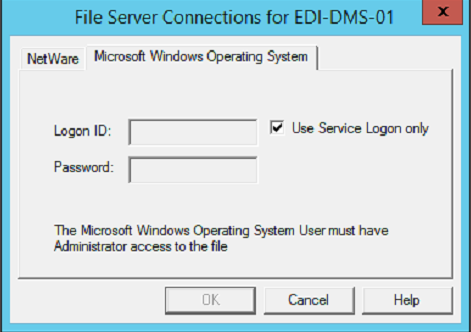
If you're not sure what account this is you can check by launching WorkSite Service Manager on your iManage Work server and in the Properties of the WorkSite Server service select 'File Server Setup' and then the 'Microsoft Windows Operating System' tab. In the screenshot below I have 'Use Service Logon only' which means it will use the same Windows account that the service 'Log On As' is set to.
Now that we know which account is being used to communicate with the File Server we need to run the same cmdkey command above as that service account. The easiest way to do this is to prefix the command with the "runas" command. For example:
runas /user:iManageServiceAccount "cmdkey /add:"jordanimanagefiles.file.core.windows.net" /user:"Azure\jordanimanagefiles" /pass:"peO7CDcEQiWXXcf2UjQeZ52UOzMLDsSjehFTkuT7byetMgAZ1/WV6ii/dFFFYS42xKWy4Hd0lt1DpKFnJsLGUw==""
I'm going to assume you're using the same service account throughout your iManage environment. If not, this process is going to be a bit more fiddly for you. We now need to run this command on the servers that contain the following iManage services:
- iManage Work Servers (All of them)
- IDOL Indexer
- Microservices Hub (OCR)
- Preview Server
We've completed most of the configuration by this point, there's just one final step.
Enable NT No PreResolve
iManage Work has a setting called 'NT No PreResolve' which is by default disabled. So by default iManage Work will pre-resolve any DNS names and store the IP for later. When your storage has a fixed IP this isn't a problem, but if your storage is in an Azure File Share this causes problems as you do not have a fixed reserved IP.
So we must disable this pre-resolve on all iManage Work Servers by doing the following:
1) Login to each iManage Work server
2) Open Registry Editor (regedit)
3) Navigate to HKLM\SOFTWARE\Interwoven\WorkSite\imDmsSvc\
4) Create the following value:
Type: String value
Name: NT No PreResolve
Value: Y

5) You must now restart the WorkSite Server service using Worksite Service Manager.
And that's everything! You should now have an Azure File Share connected to your on-premises iManage Work installation. As I mentioned previously you must assign the new iManage File Server to users for files to start saving to the Azure File Share.