Granting Access to Private Items in an Exchange Mailbox

In this post we're going to be covering the different methods you can use to grant access to private items for delegates of a mailbox. This issue usually surfaces as a user reporting that they can see the unread item count is showing items but there are no unread items in the folder when they open it.

I would recommend only ever changing this on Shared mailboxes and never on a User mailbox. There's usually a reason an email has been sent as private and in the case of a User mailbox the mailbox owner will always be able to see these items as intended. The issue with Shared mailboxes is that nobody should be logging in to these directly using the AD object's credentials (the AD account of a Shared mailbox should always remain disabled to reduce the attack surface), which means it will only be accessed by delegates who cannot see these private items by default.
I'll be using Exchange Online and Azure AD for this article. Method two will be slightly different if you're running Exchange Hybrid and syncing from on-prem AD.
The Methods
There are a number of methods that we can use to achieve this and I will explain how to do each of these:
- Create a Transport Rule to remove the Private flag from the email before it even hits the mailbox
- Log into the mailbox and enable "Delegate can see my private items"
- Use the EWS API to enable "Delegate can see my private items" on the mailbox
Create a Transport Rule to remove the Private flag from emails
This method is easy to implement and will essentially strip out the Private tag on incoming emails to certain mailboxes. I would suggest creating an AD Mail-enabled Security Group to use in the Transport Rule so that you don't need to modify this rule every time you want to apply it to a new mailbox. This rule won't change the sensitivity flag on any existing emails in the mailbox, it will only affect emails received after the implementation of the rule. Here is how we would set this up:
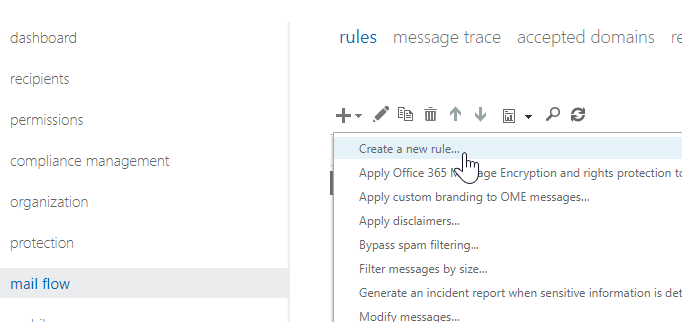
- Navigate to Mail Flow -> Rules and create a new rule
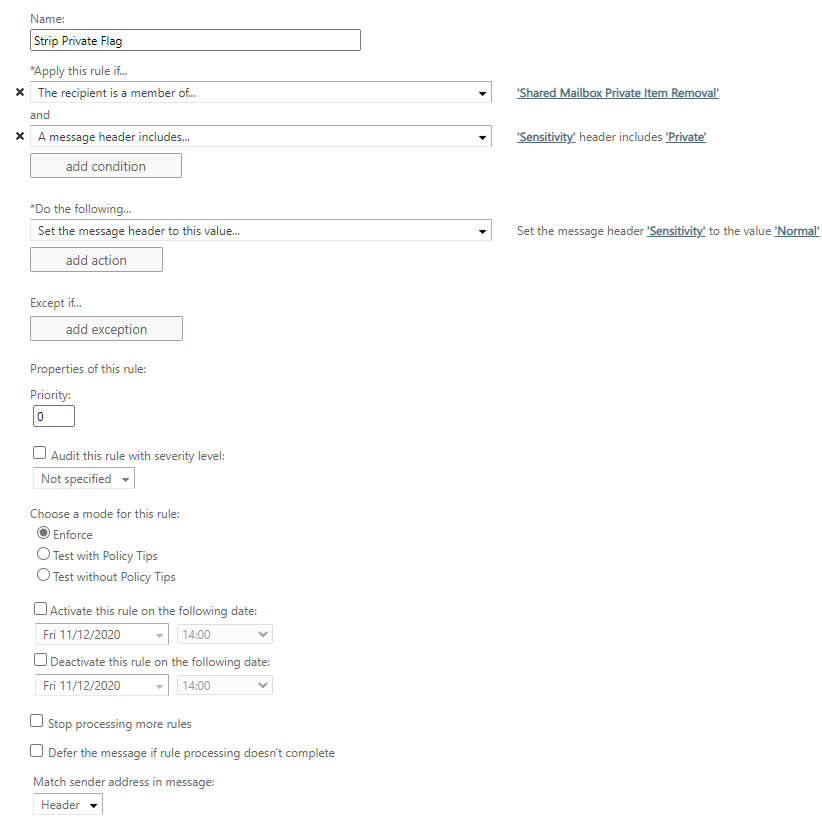
2. Configure the rule with the following configuration:
3. Save the new rule.
So just to recap... If an email sent to any mailbox that's a member of the group we selected (in my case 'Shared Mailbox Private Item Removal') AND the sensitivity of the email is 'Private' THEN set the sensitivity flag to 'Normal'.
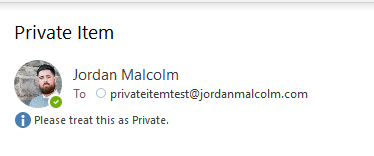
Sending a test email (with the Sensitivity set to Private) we can see the following in the sent items:
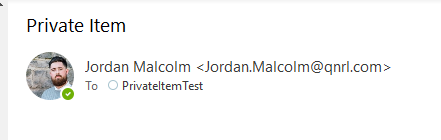
But in the inbox of the recipient:
And the header:

One of the big drawbacks of this method is that the message itself has been modified to no longer have the 'Private' sensitivity flag. This means that any responses will now no longer have the Private flag and there may be a reason the sender doesn't want the item viewable by their delegates.
Log into the mailbox and enable "Delegate can see my private items"
If you only need to make the change to one mailbox then this method will work but if it's any more than one I would look at another method or you'll spend a long time doing them all individually. These steps will assume you're doing this to a Shared mailbox that is disabled, unlicensed etc.
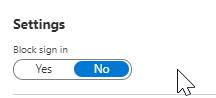
1) First of all we need to prepare the Shared mailbox to be logged into. We'll need to set 'Block sign in' to No in Azure AD.
2) Next we'll need to reset the password in Azure AD so that we can log into it.
3) We then need to convert it to a User Mailbox and assign it a license
4) On a machine with Outlook installed create a new mail profile using the UPN and password of the mailbox
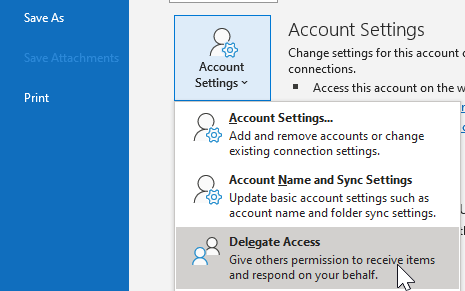
5) Now that you've logged into the mailbox, jump into File > Account Settings > Delegate Access
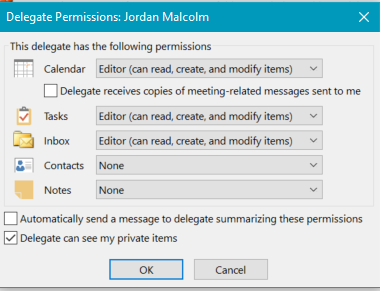
6) Select the user and configure the permissions as desired but make sure to check "Delegate can see my private items"
7) Repeat for each user that should be able to see Private items in that mailbox.
8) Convert the mailbox back to Shared
9) Block sign-ins again
10) Reset the password back to a random string
As you can see this process is a lot more cumbersome and will need to be repeated for every mailbox and every user that needs to see private items in that mailbox.
Use the EWS API to enable "Delegate can see my private items"
The final method I am going to cover is to set the above setting using the EWS API to remove the need to log in as the mailbox. The following PowerShell is fairly basic, I just wanted to demonstrate the EWS API calls. I would suggest building in some basic error handling, passing in a list of delegates etc. You will likely need to adapt this to suit your needs, but I hope this will at least give you somewhere to start.
1) Ensure you have the EWS API installed on the machine you plan to run this from (https://www.microsoft.com/en-us/download/details.aspx?id=42951)
2) Here is our PowerShell:
#First of all let's set the mailbox we want to modify and the delegate we want to add
$UsernameToChange = "SharedMailbox@jordanmalcolm.com"
$DelegateToAdd = "jordan@jordanmalcolm.com"

#This will prompt for credentials, this will be administrator credentials
if ($Credential -eq $null){$Credential = Get-Credential}

#Import-module on the EWS API DLL we installed in step 1
Import-Module -Name "C:\Program Files\Microsoft\Exchange\Web Services\2.2\Microsoft.Exchange.WebServices.dll"
#Create an EWS Webcredentials object to use later
$ExchangeCredential = New-Object Microsoft.Exchange.WebServices.Data.WebCredentials($Credential.Username, $Credential.GetNetworkCredential().Password, $Credential.GetNetworkCredential().Domain)
#Create the ExchangeService object
$ExchangeService = New-Object Microsoft.Exchange.WebServices.Data.ExchangeService
$ExchangeService.UseDefaultCredentials = $true
$ExchangeService.Credentials = $ExchangeCredential
$ExchangeService.AutodiscoverUrl($UsernameToChange, {$true})
#Fetch current delegates of the user to determine if we're ADDing a delegate or UPDATEing an existing delegate. We're calling the GetDelegates method here
$CurrentDelegates = $ExchangeService.GetDelegates($UsernameToChange,$true)
#Reset the $Exists Variable
$Exists = $false
#Loop through the delegates returned and if the address matches our $DelegateToAdd set $exists to $true, if it does not match it will remain $false
foreach ($ExistingDelegate in $CurrentDelegates.DelegateUserResponses) {
    if ($ExistingDelegate.DelegateUser.UserId.PrimarySmtpAddress.ToLower() -eq $DelegateToAdd.ToLower()) {
        Write-Host "$DelegateToAdd exists. Updating instead of adding."
        $Exists = $true
        #Set the ViewPrivateItems flag to $true
        $ExistingDelegate.DelegateUser.ViewPrivateItems = $True
        #Call the UpdateDelegates method to apply the changed flag
        $ExchangeService.UpdateDelegates($UsernameToChange,$CurrentDelegates.MeetingRequestsDeliveryScope,$ExistingDelegate.DelegateUser)
}}

#If $exists is $false then the ADD logic below will kick in
if ($exists -eq $false) {
    Write-Host "Adding $DelegateToAdd"
    #Create an object for the delegate
    $Delegate = new-object Microsoft.Exchange.WebServices.Data.DelegateUser($DelegateToAdd)
    #Set ViewPrivateItems to $true
    $Delegate.ViewPrivateItems = $True
    #Create an array to be passed to the AddDelegates method
    $DelegateArray = new-object Microsoft.Exchange.WebServices.Data.DelegateUser[] 1
    #Add our delegate to position 0 of the array
    $DelegateArray[0] = $Delegate
    #Call the AddDelegates method to apply the changed flag
    $ExchangeService.AddDelegates($UsernameToChange,$CurrentDelegates.MeetingRequestsDeliveryScope,$DelegateArray)
}
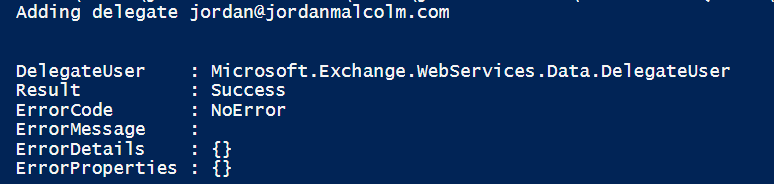
3) The following result is returned, this shows it has applied successfully:
We can see that the folder is now showing the missing item when viewing the folder from Jordan@jordanmalcolm.com:
